Photo Tip: Creating Black Backgrounds
A Simple approach to Underwater Photography
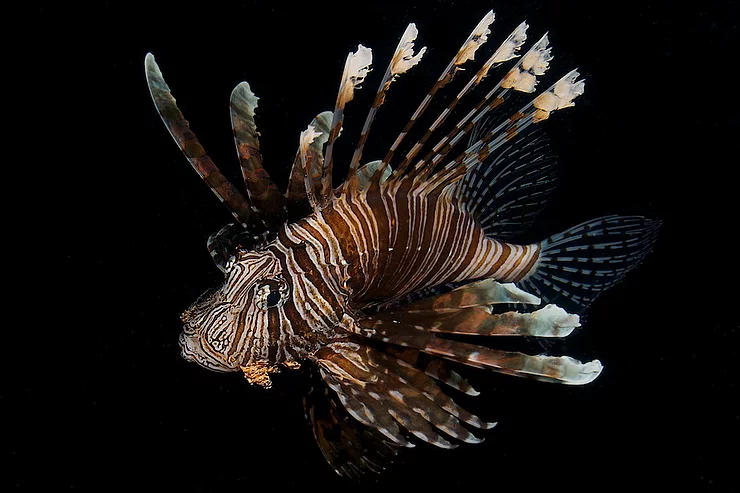
In underwater photography, black backgrounds are a great way to emphasize and highlight your subject. This can sometimes be a frustrating and challenging task, but you can simplify the process by following a few basic steps. Spend a little time setting up your shot, preset manual exposure controls and experiment with camera and strobe angles and lighting to get the results you want. The isolation of subjects against a black background is used primarily for macro photography, but it can also be used for larger subjects.
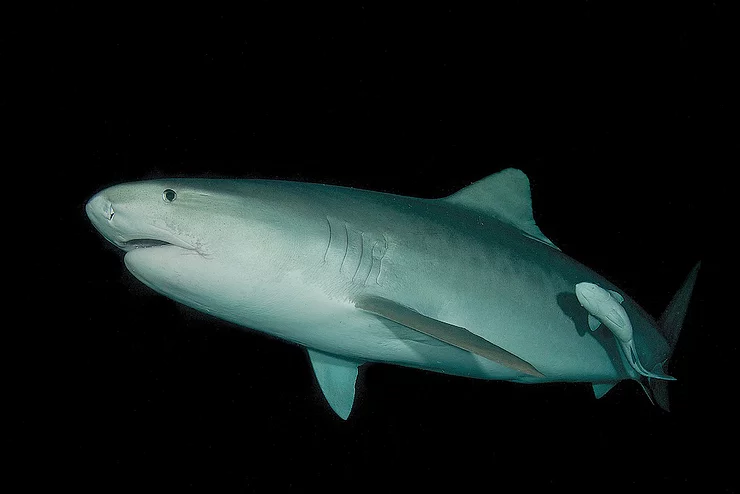
You can use this technique for large subjects like this 14 foot-Tiger Shark.
First, select a subject that has mostly water in the background. Try to find a subject that is perched on a rock or sitting on a coral branch. An easier approach is to photograph a critter that is up in the water column
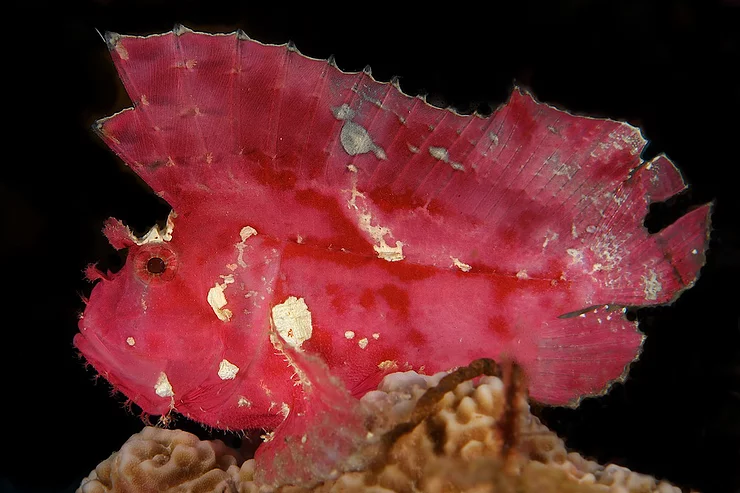
I got below this Leaffish perched on coral to remove some objects from the background.
 Second, follow the simple rule of getting close, getting down and shooting upward to isolate your subject. Preferably you want to get as close as possible to your subject and fill the frame. Get lower than your subject and shoot upwards to eliminate anything in the frame that may appear behind your subject. If the light from your strobe doesn’t have anything in its path except for the main subject, there is nothing else to reflect the light back to the camera lens. Use a combination of camera control settings, so that there is no visible ambient light. You will be using only artificial light from your strobe(s) to expose the subject.
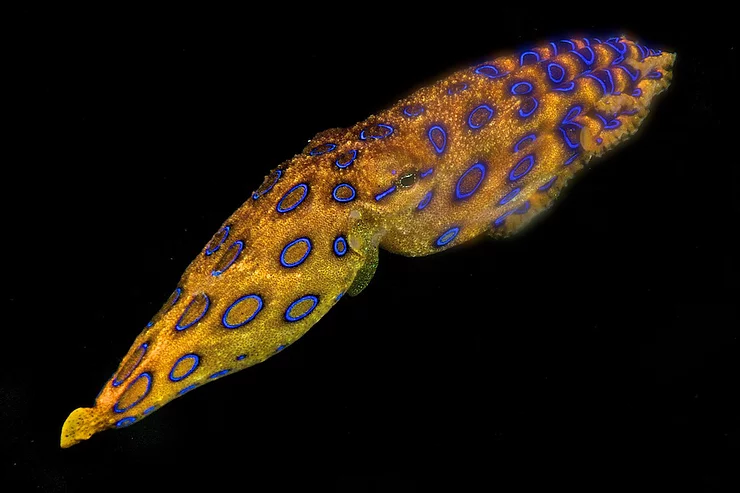
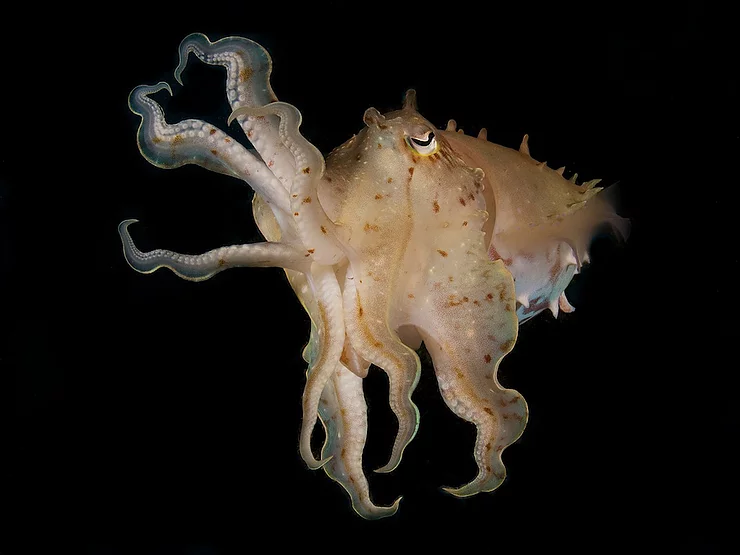
Some subjects, like this Blue Ring Octopus, are easier to expose with a black background while up in the water column.
Third, preset your camera settings and strobe output so that you will just paint the subject and perhaps the foreground with light. I like to use a low ISO (usually 100 or 200), a fast shutter speed (at least 1/200th of a second or faster), and a small aperture to limit the amount of light in the exposure. Keep in mind that your depth of field (or area that is in focus) is largely dictated by the aperture you use. The higher the aperture number (the smaller the hole in the lens), the larger the depth of field. If you are using a lens that has a narrow angle of view, such as a Nikon 105mm macro lens, the smaller the depth of field. This is especially true for macro subjects. This is where the aperture really becomes more critical, and any advantage you can obtain by using a higher numbered aperture will allow you to get more of the subject in focus. If you are shooting larger animals with a wide angle lens this is less of an issue.
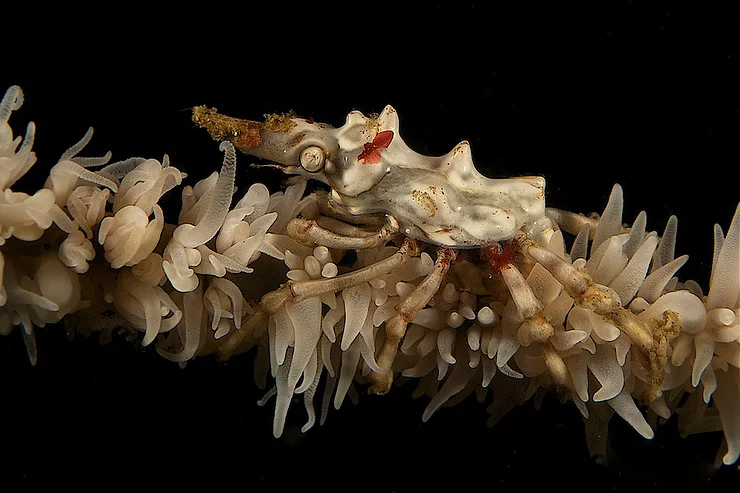
Macro critters found on whip corals are excellent subjects for creating black backgrounds because it is easy to avoid objects in the background.
I have found that the easiest way to obtain the correct amount of light for your image is to use manual exposure. I like to use a single setting for ISO and Shutter Speed, with a constant amount of light output from my strobes. If you play with this a little, you can come up with an F/Stop (aperture setting) that will put you in the ball park for getting the right amount of light for macro images, medium portraits and wide-angles. That way you can tweak the exposure by just adjusting the aperture to give you the right amount light for your subject and obtain a black background.
Approximate Settings
- Camera on Manual
- ISO set to 100 or 200
- Shutter Speed at 1/200th to 1/250th
- Set your strobe(s) on a manual setting (1/4 power for most strobes will give you plenty of light) to give you a constant light source. Note that strobe to subject distance will also impact exposure. If you double the distance of the strobe to your subject, you will cut the light in half.
- Starting point setting for Aperture
- F/25 for macro subjects
- F/16 for medium size portraits
- F/11 for wide-angle close-ups
It is important to carefully use your strobe positioning to avoid lighting things that may be found behind the subject.
Finally, you will want to limit the amount of light from your strobe and try to use a strobe angle that will light as little of the background as possible. If there is anything in the background behind your subject, (and sometimes you just can’t avoid this), you may be able to angle your strobe to avoid lighting these objects. Take multiple shots and work on strobe angles being careful to just illuminate the subject. If you are shooting a subject up in the water column and there is nothing but water behind your subject, you can use a strobe position that will just minimize backscatter. For example, with a wide angle-subject you can position your strobes outward at a 45-degree angle. You may even consider using a single strobe. if the subject is angled so that it just presents one side toward the lens, you don’t have to worry about the appearance of harsh shadows in the image.